SAML over OAuth (SAML NextAuth.js integration)
SAML over OAuth (SAML NextAuth.js integration)
Add SAML support to OAuth-based applications, like those using NextAuth.js
If your application relies primarily on OAuth to log users in, such as if you use NextAuth.js, then SSOReady’s “SAML over OAuth” support makes sense for you to use. This article will explain how to add SAML support to your OAuth-based application in just a few minutes.
If you’re not using NextAuth.js, or if you haven’t already committed to only using OAuth to do logins, you will probably find the standard SSOReady API easier to use. OAuth introduces its own complexity that makes the SAML-over-OAuth integration path a bit more complicated than the standard path.
Getting started with SSOReady
This guide will take you through:
- Basic concepts. How Enterprise SSO / SAML works at a high level, and how SSOReady will help you implement it in your OAuth/NextAuth.js-based stack.
- Code implementation. What you’ll need to build, and how to use SSOReady’s SAML-over-OAuth provider.
- Onboarding customers. SAML requires both you and your customer do setup. SSOReady automates your end of the equation, and this section describes what instructions you’ll give to your customers.
SSOReady is just an authentication middleware layer. SSOReady doesn’t “own” your users, and it doesn’t require you to use any particular tech stack. That’s on purpose — it makes onboarding easier for you, and it forces us to keep earning your business in the long run, because churning is easier.
Basic Concepts
“Enterprise SSO” is mostly a synonym for a protocol called SAML. It’s a way for a company to easily let their employees log into all their software products, including your product.
At smaller companies, employees use username+password or “Log in with Google” to sign into your product. At larger companies, employees instead expect to use services like Okta or Microsoft Entra (formerly “Azure AD”) to do sign-in. Those sign-ins happen using the SAML protocol. SSOReady makes it way easier to implement SAML. SSOReady’s OAuth-over-SAML functionality makes SAML fit into existing OAuth-based applications.
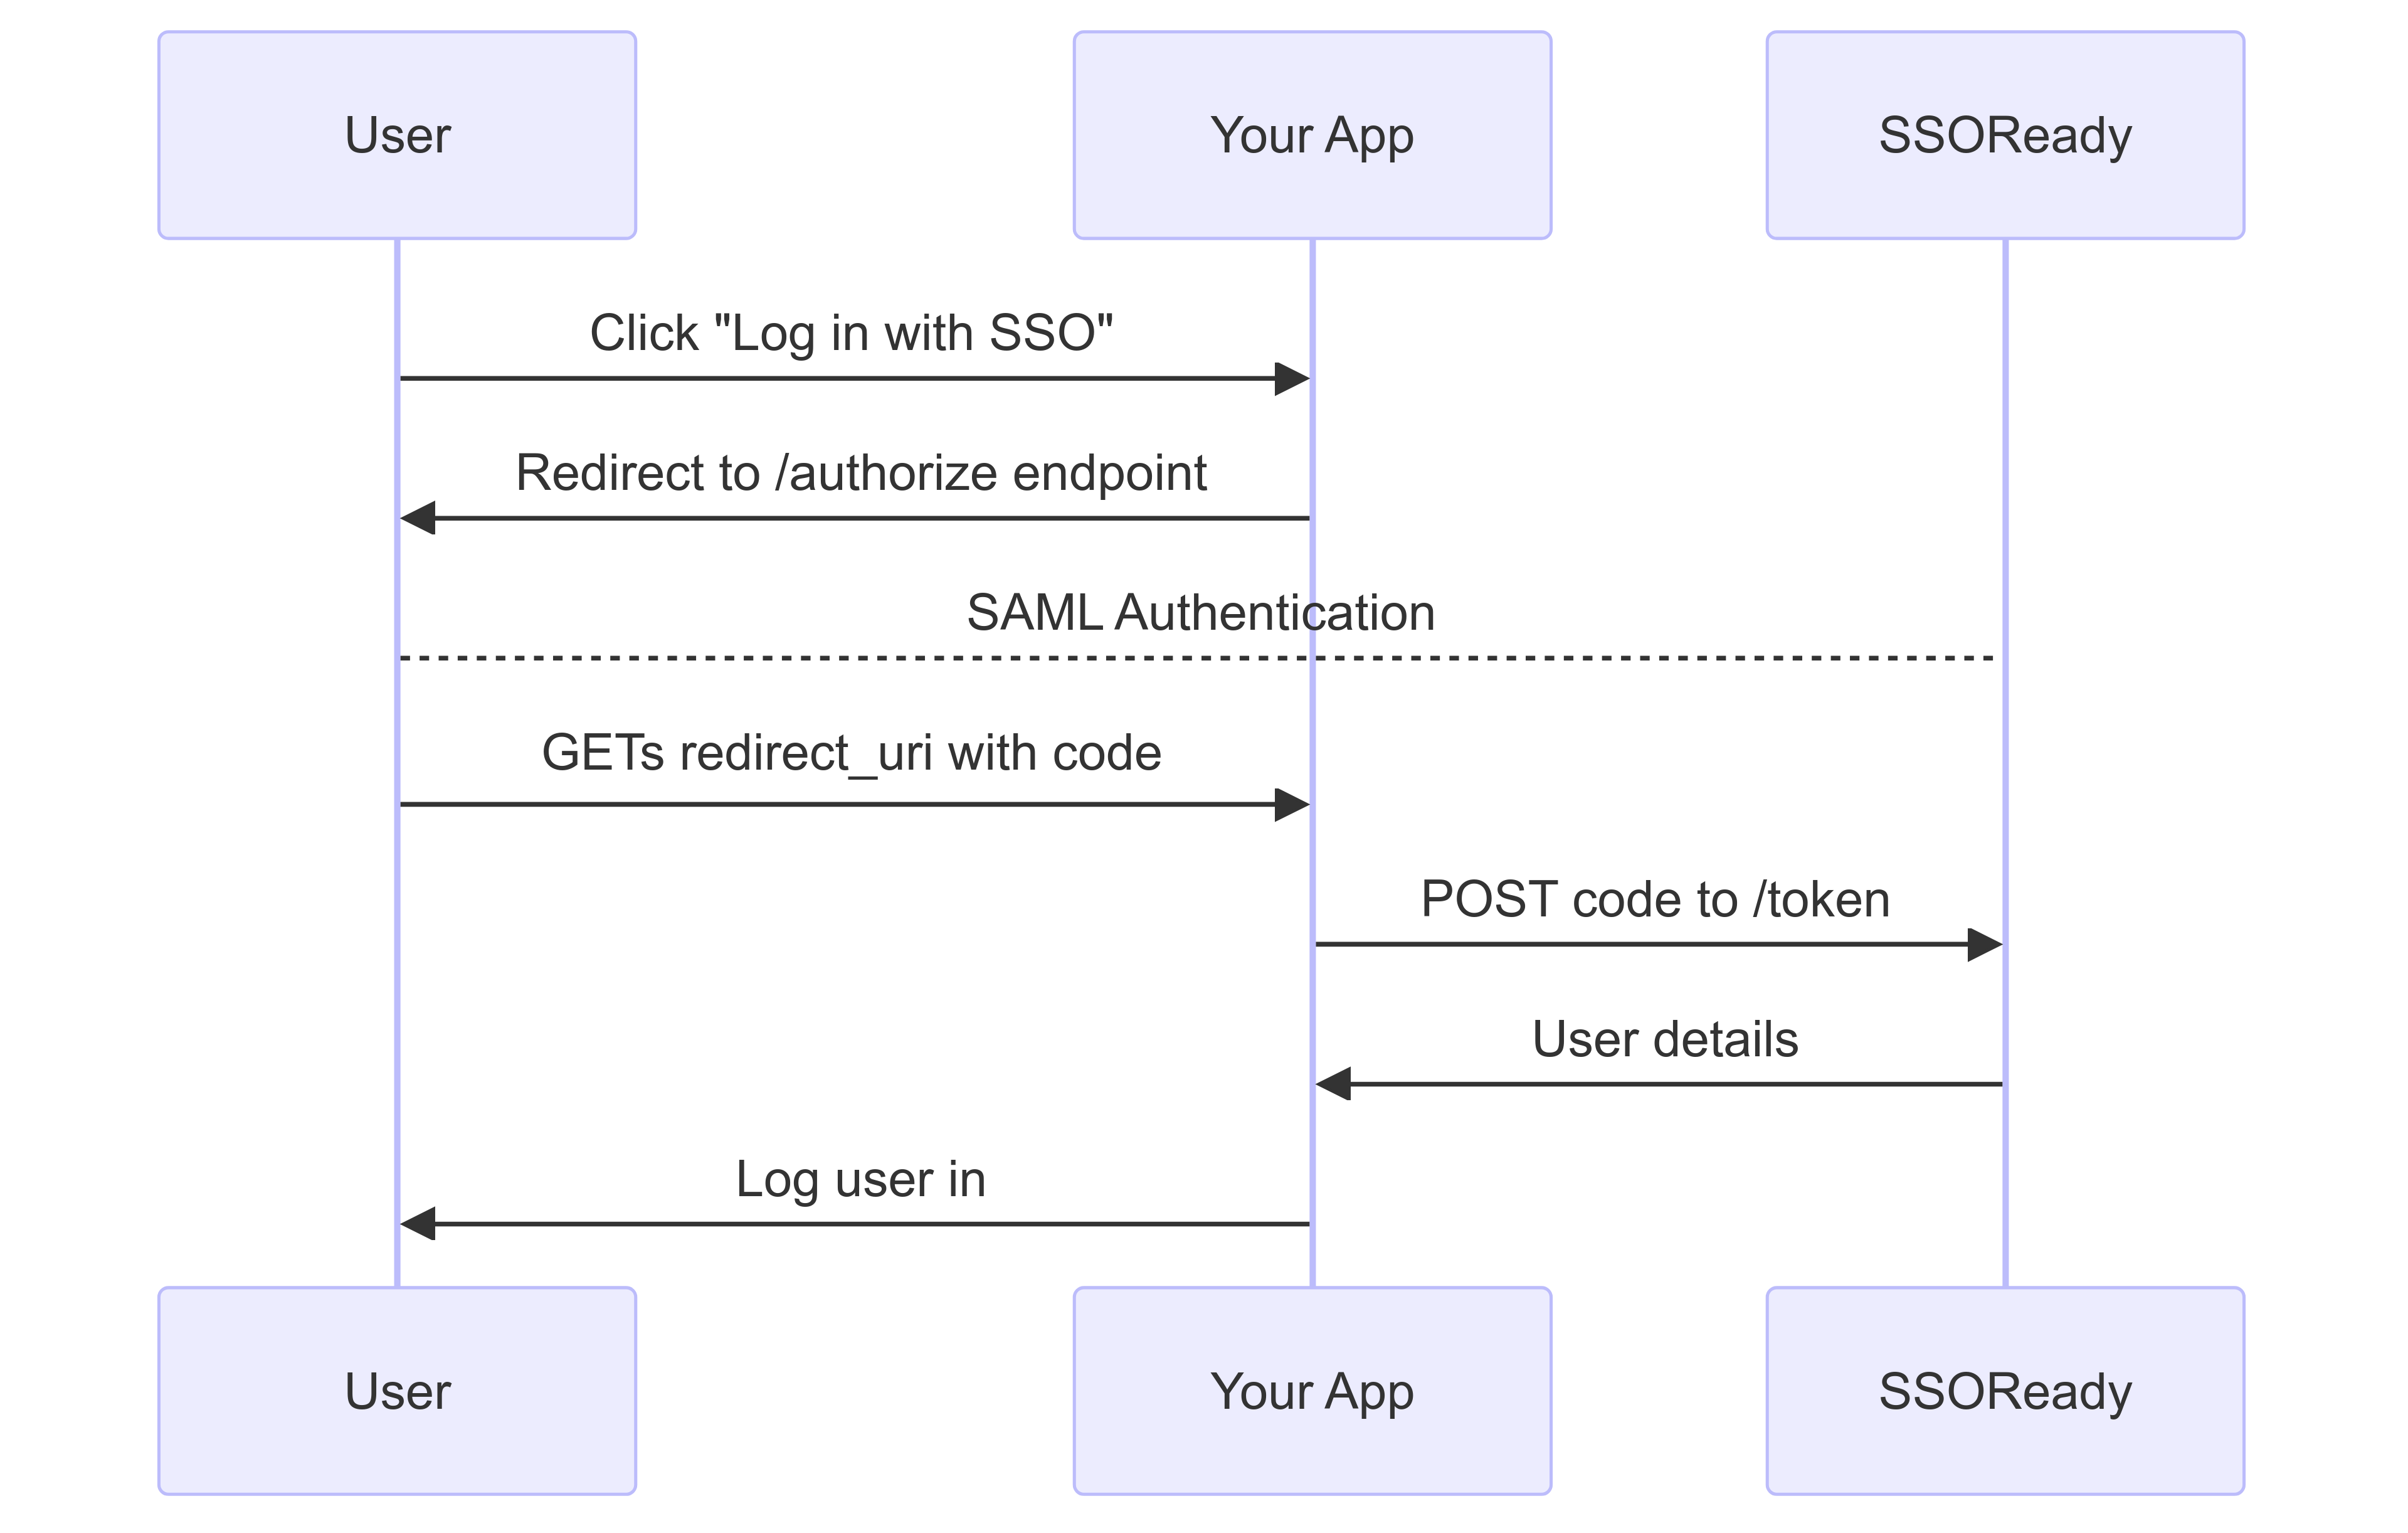
SAML logins have two steps:
- You initiate a SAML login by redirecting your user to their corporate Okta/Google/Microsoft.
- Their corporate Okta/Google/Microsoft redirects your user back to your app, and you handle the SAML login.
Before this can happen, you and your customer need to exchange settings about each other. This process is done offline; you’ll give your customer some settings that SSOReady provides for you, and you’ll email your customer asking for some settings in return which you’ll input into SSOReady.
We’ll cover how to do (1) and (2) in Code implementation. We’ll cover the setup work you’ll need to do inside SSOReady’s webapp in Setting up SSOReady. We’ll cover the settings you’ll give and ask for in Onboarding customers.
Code implementation
To implement SAML over OAuth, you’re going to implement a typical OAuth “Authorization Grant” flow.
If you’re using NextAuth.js, you can just straight to the “Code implementation for NextAuth.js” section below.
Initiating SAML Logins
Under the hood, initiating SAML logins requires you to get your user’s browser to perform an HTTP POST against their corporate Okta/Google/Microsoft with a specific XML message. SSOReady’s SAML-over-OAuth flow abstracts this away into a normal OAuth “authorize” redirect endpoint.
To start a SAML login, redirect your users to this /authorize endpoint:
That URL requires an OAuth client ID (saml_oauth_client_...) and an organization_external_id. How you get those is
covered in Setting up SSOReady later on this page.
Handling SAML Logins
Under the hood, SAML login details are sent to you in the form of your user’s web browser POST-ing you an XML message. You would then need to authenticate that message before logging your user in.
SSOReady abstracts this away; we handle authenticating the message, and instead forward your user to an OAuth redirect
URI on your webapp with a code parameter.
So what you’ll need to do is create a new “SSOReady OAuth Redirect URI page” (typically something like
https://app.yourcompany.com/api/auth/callback/ssoready), where you’ll expect a ?code=saml_access_code_... query
parameter in the URL. From your backend, you’ll exchange that access code for a user’s details:
That will return something like this:
That id_token is a JSON Web Token (“JWT”). The id_token is signed
by using an SSOReady RSA private key. You can get the corresponding public key, in JSON Web
Key Set form, here:
Ultimately, the id_token will contain the following claims:
In other words, id_token will contain claims including the user’s email as well as the SSOReady organizationId and
organizationExternalId they belong to. It’s your responsibility to then log the user in with that given email and
organization using whatever mechanism your tech stack uses.
How you tell us about your desired “SSOReady OAuth Redirect URI”, as well as what organizationId and
organizationExternalId mean, is covered in Setting up SSOReady below.
Code implementation for NextAuth.js
If you’re using NextAuth.js, you’ll need to add a new provider to your NextAuth initialization. How you do this
depends on whether you’re using next-auth@v4 (the more common option today) or next-auth@beta (also known as
“Auth.js”):
next-auth@v4 (more common)
next-auth@beta (aka Auth.js)
Add the following to wherever you construct your NextAuth instance:
From there, whenever you want to log a user in, you run:
The SSOReady OAuth provider will give you profiles containing an email, organizationId, and
organizationExternalId. email is the email of the user who just logged in. What organizationId and
organizationExternalId mean is covered in Setting up SSOReady below.
Note that because organizationExternalId is required, the default NextAuth.js login page (i.e. at /api/auth/signin)
will not work with SSOReady, because that UI does not provide any organizationExternalId. This is an intrinsic
constraint of SAML. You must always log in
via SAML to a particular customer’s SAML instance. That’s just how
SAML works. That’s why organizationExternalId is required.
Finally, you’ll also need to add to your .env file these values:
next-auth@v4 (more common)
next-auth@beta (aka Auth.js)
You’ll get these environment variable values in “Creating SAML OAuth clients” below.
Setting up SSOReady
In Code implementation, there were three missing pieces that you’d need to implement SSOReady:
- Where does the SSOReady callback page get configured? That information lives on environments.
- Where do I get an OAuth client ID and secret? You create a SAML OAuth Client scoped to an environment.
- How do I get
organizationExternalId? You create an organization in an environment, where you can choose an external ID convenient for you.
This section will step you through how you’ll do all of this setup in SSOReady’s webapp. As a prerequisite step, you’ll need to sign up to SSOReady. It’s free and anyone can sign up, even with a personal email.
Creating environments
To create an environment, go here. You’ll typically create one environment per deployment environment, e.g. one each for “production”, “staging”, and “local dev”. After creating the environment, edit it to have an OAuth Redirect URI. That’s the URL your users get redirected to in “Handling SAML logins”.
NextAuth.js calls the SSOReady OAuth Redirect URI a “redirect URI” or “callback URL”. Its value should be something like:
or
(See Step 2 of NextAuth.js’s OAuth “How-to”. The
[provider] in this case is ssoready.)
Creating SAML OAuth clients
SAML OAuth Clients are scoped to an environment. When viewing an environment in the app, click “API Keys” on the left
navbar. Then click “Create SAML OAuth Client”. A popup will show you your new SAML OAuth client’s secret (it starts with
ssoready_oauth_client_secret_...). That’s
the client_secret you’ll
use in “Handling SAML Logins” or in your NextAuth.js config.
After clicking “View SAML OAuth Client” on that popup, you’ll
also see the client’s ID (it starts with saml_oauth_client_...). That’s the client_id you’ll use in “Initiating SAML
Logins” and in “Handling SAML Logins”, or in your NextAuth.js config.
Creating organizations
An organization corresponds to a corporate customer of yours. If you sold your product to Apple, Nvidia, and Amazon, you’d have three organizations in SSOReady: one each for Apple, Nvidia, and Amazon.
Organizations belong to an environment. When viewing an environment in the app, the “Create organization” button creates a new organization. Organizations have two properties worth highlighting:
- An optional external ID, which you can assign. If you’re selling multi-tenant B2B software, you probably already have a concept that closely matches an SSOReady organization — usually, this is something named a “team”, “workspace”, “company”, or something similar. When creating an SSOReady organization, use your product’s counterpart to an organization ID as the external ID.
You’ll provide the external ID as the organizationExternalId in “Initiating SAML
logins”. The external ID is returned to you when “Redeeming SAML
logins”.
- A set of domains. If you expect Apple’s employees will log in to your product from
@apple.comand@shazam.comemail addresses, then putapple.comandshazam.comhere. SSOReady will enforce that users’ SAML logins come from these domains.
Creating SAML connections
A SAML connection holds onto SAML-related settings. In “Onboarding customers”, you’ll be providing and asking for settings. Those settings all live on an SSOReady SAML connection.
SAML connections belong to an organization. When viewing an organization in the app, the “Create SAML connection” button creates a new SAML connection. Beyond the SAML-related settings covered in “Onboarding customers”, SAML connections have one setting of note: whether they are primary.
Each organization has up to one primary SAML connection. In “Initiating SAML logins”, you
provide an organizationExternalId. SSOReady will use that organization’s primary SAML connection to initiate the
login.
Onboarding customers
In Basic concepts, we mentioned that you and your customer need to exchange details about each other before you can do SAML logins. This process happens offline — there’s no coding involved.
You have to go through this process each time a new company wants to set up SAML. It’s inherent to how SAML was designed.
With SSOReady, you have two options for onboarding customers onto SAML — that is, exchanging SAML-related settings with them. You can:
- Use SSOReady’s self-serve setup links. You give your customers a link, where they can set up SAML on their own. It’s a slick experience for your customers, and they’ll get set up in minutes. We recommend this approach.
- Give your customers instructions yourself, over email/slack/Zoom/etc.
If you go with option (2), be advised that SAML identity providers (e.g. Okta, Microsoft Entra, Google Workspace, etc.) don’t use the same terminology for these identical details. To deal with that, we’ve prepared a separate set of documentation for you to follow depending on what identity provider your customer uses:
- Okta
- Google Workspace
- Microsoft Entra (aka Microsoft Azure Active Directory, Microsoft Azure AD)
- JumpCloud
- Ping Identity
In all cases, you’re ultimately going to:
- Give your customers an “SP Entity ID” and “SP ACS URL”. SSOReady’s webapp gives you both.
- Ask your customers for an “IDP Entity ID”, “IDP Redirect URL”, and “IDP Certificate” which you input into SSOReady.
Once you have all those details, you’ll be ready to accept SAML logins!